Heat Generation -
The EAH5870 is not the coolest running GPU you will find although it is far from the worst. We typically saw idle temperatures of around 41c at stock speeds and 49c when we overclocked the GPU and memory. Under load things got even warmer. With our stable overclock (which we will talk about below) we had temperatures of around 68c during our Furmark Runs and around 63c during gaming. Stock Furmark temps were around 62c and gaming was between 57 and 59c. We also found that to maintain proper temps during the overclocking testing we had to run the fan at 100% for some reason the auto fan would not kick on quickly enough when we went from idle to load while overvolting. This created a significant amount of noise; ok it was loud and annoying. If you are thinking of really pushing this card, you might want to consider water cooling or another high-end replacement cooler.
***Note, we do not remove the cooling for photographing the PCB until after all testing is done. This prevents any discrepancies in heat generation readings. All add-in graphics cards are tested as they arrive from the factory.
Overclocking -
Overclocking the EAH5870 V2 was a snap. Using the Smart Doctor software I was able to just move the slider over with my mouse. Which reminds me; I would like Asus to add in the ability to manually key in numbers when using the Smart Doctor software. My final clock speed of 1002MHz was because I was not able to nudge the slider to 1000MHz from either direction. We did try to push things a little farther but even bumping the voltage past 1.236 we could not get past 1002MHz core and 5204MHz memory (1301MHz). Again we had to run the fan at 100% to maintain this speed, which was annoying to say the least. You could hear the fan throughout the house when it was on, it was that loud.
***Overclocking is always going to be a hit and miss thing. The speeds that we are able to reach do not indicate what all cards are capable of. We can show you potential only, your speeds will vary based on the systems you use and the individual cards purchased.
Asus SmartDoctor and GamerOSD -
The reason I have combined these two bits of software is that you have to have GamerOSD installed to use all of the functions of the SmartDoctor. If you install SmartDoctor without GamerOSD you get a nice warning every time you run it. To avoid this with every boot we installed GamerOSD.
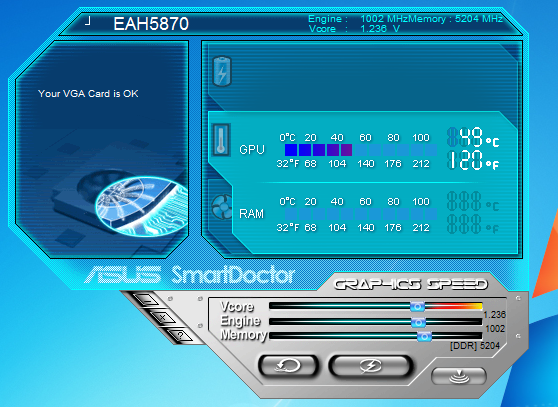
SmartDoctor -
This is the overclocking software that Asus provides for its GPUs. To be honest, I do not like the UI. The colors are garish, the animation distracting and the sliders are terrible. That does not mean that it does not work well. Other than the lack of accuracy offered by the very picky sliders it can quickly get you up and running at much higher clocks than you may think a GPU is capable of. We hit 1002MHz core on our very first attempt. After that is was only pushing the memory up in small increments for our final clock.
Click to see GPUz Validation
The voltage adjustment is a little picky as well, we found that when pushing beyond 1.2V we would get random errors + or – about .022 - .038v so at 1.236 we had actually set the voltage to 1.214 and with the error we hit 1.236. We tried multiple times for 1.215, but ended up all over the place so once we got back to 1.236 we stayed there.
 |
 |
 |
 |
Although the UI is terrible looking (in our opinion) the software does have some excellent options. One that is sure to appeal to many potential overclockers is the overheat protection found on the first page. The rest of the settings on this page are less interesting and are more about removing distractions during gaming. The monitoring tab has quite a few options that are not available. We found this one a little odd especially given that we use an Asus motherboard for our GPU testing rig. The fan control page is great; it has three options for you, Auto, Manual and SmartCooling. The SmartCooling options will be of interest to anyone looking to attempt high clocks but does not want to hear that high pitched fan noise all the time. It allows you to set temperature thresholds for the four levels of fan speed. We were able to use this to good effect as we could let the EAH5870 run at 1GHz and when idle the fan noise was greatly reduced. The last tab is called HyperDrive; this page lets you enable an overclocking profile for your GPU. It is fairly self-explanatory.
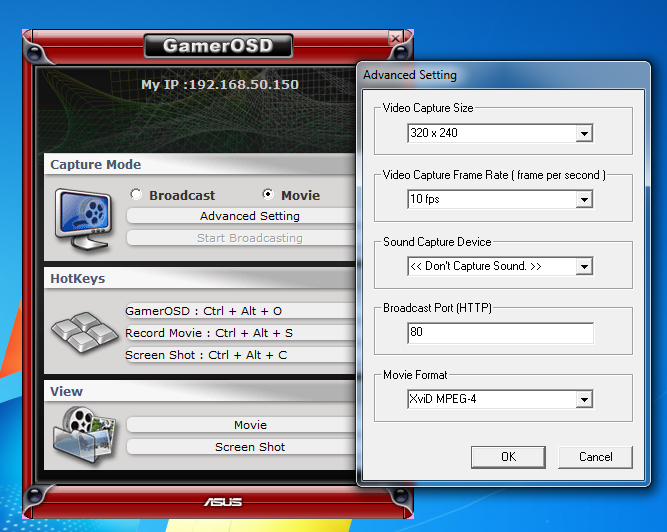
GamerOSD -
The GamerOSD software seem to be not much more than a capture and sharing software. You can chose to broadcast directly or capture the footage (or screen shots) to a file on the local system. While I can imagine that for some this will be a handy piece of software, for me I do not see the value in having this. Don’t get me wrong, it is a fairly cool bit of software and eliminates the need to buy a third party capture software like snag-it or FRAPS. I just would never use it.