The Box and Goodies -
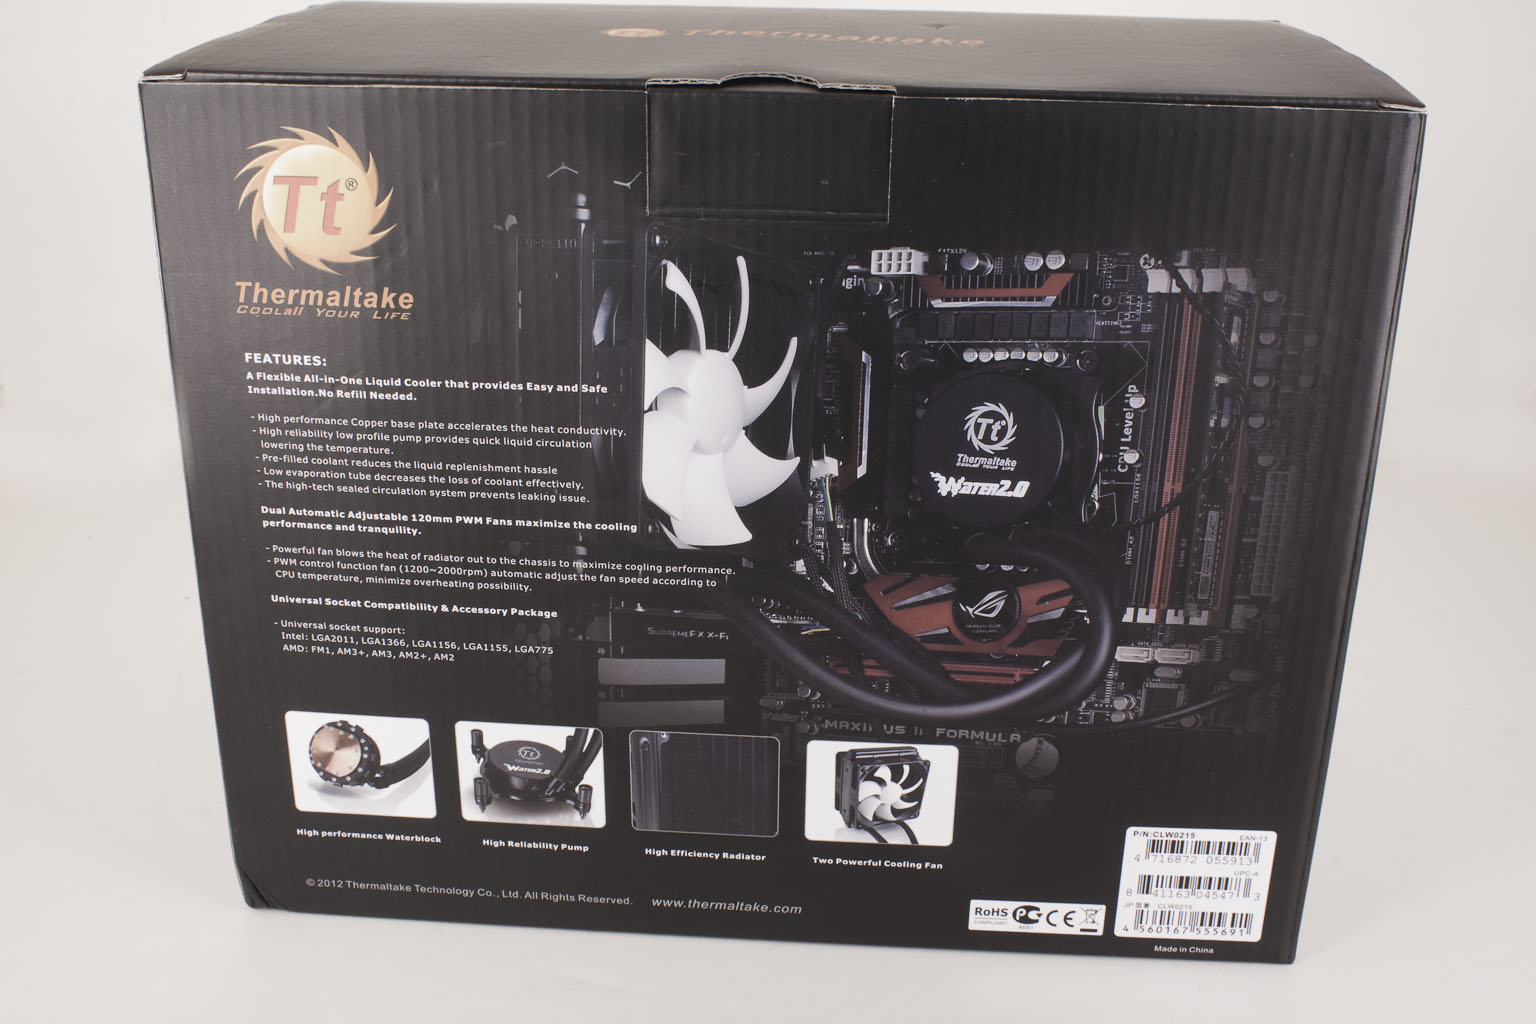
The box that the Water 2.0 Performer comes in is a fairly sizable box. Of course it has to be to make sure everything fits inside it. On the “front” of the box is a nice picture of the self-contained unit with a splash of blue water going across it (in keeping with the name of the product. You also will see that Thermaltake is making sure that you know it fully supports Intel’s LGA 2011 CPUs. A short listing of features also graces the front of the box.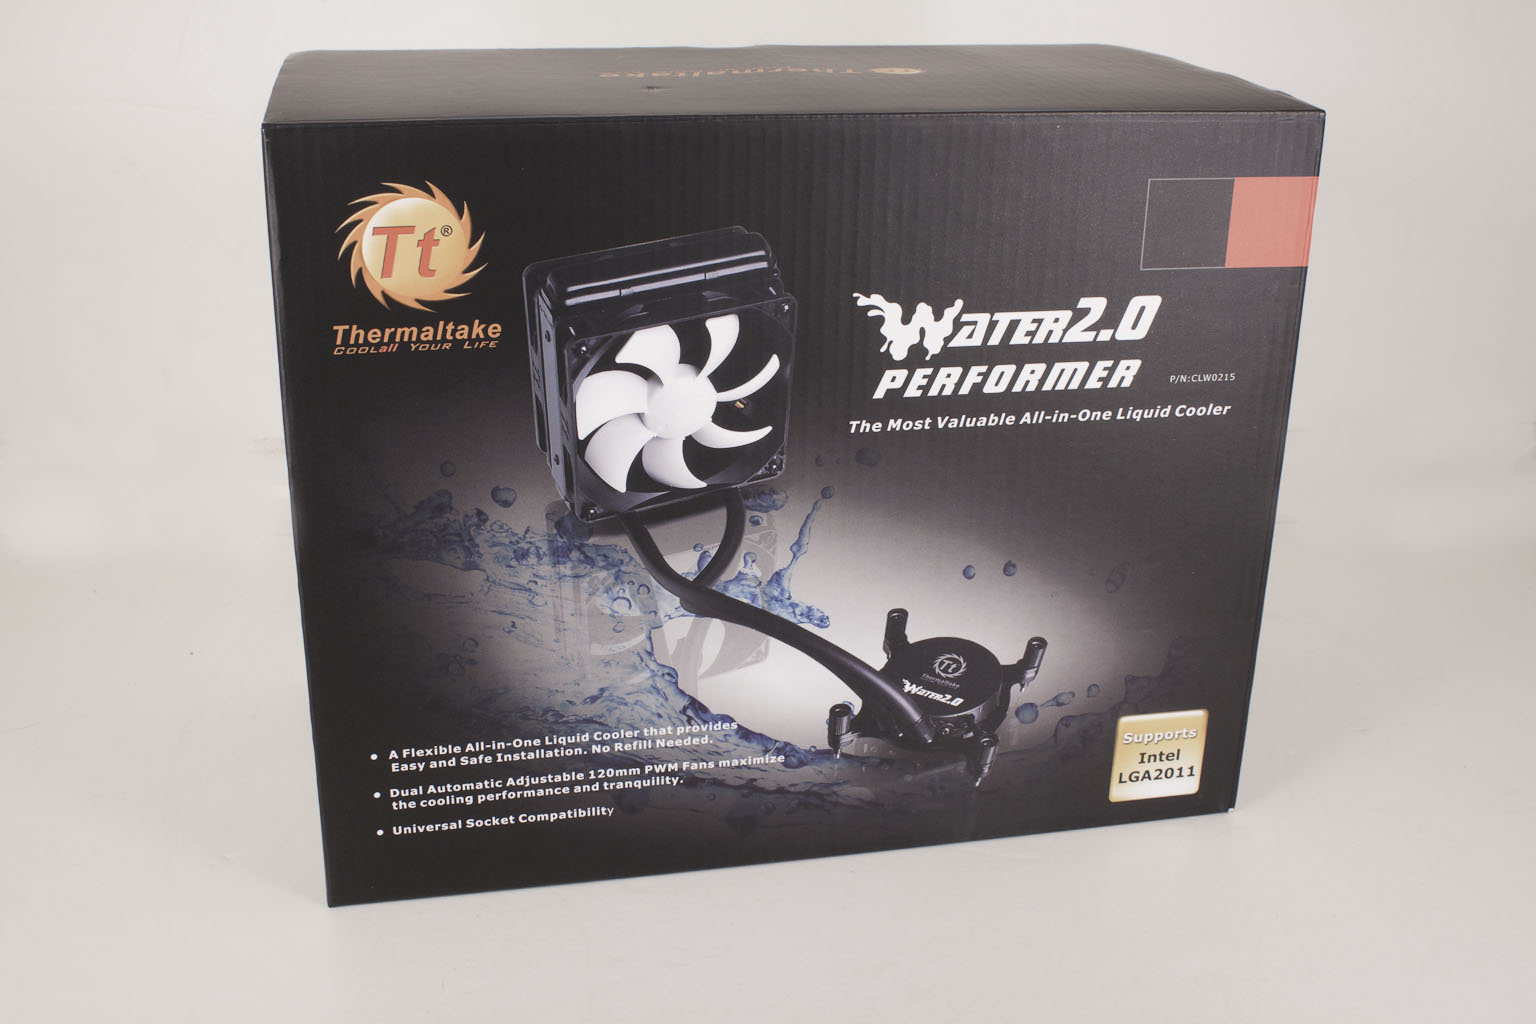 The back of the box shows you the Water 2.0 Performer installed on an Asus Maximus III Formula (an older board, but still a very good one). You also get a more detailed listing of important features like the High-performance Copper base plate, Low Evaporation tube and more. Thermaltake has also thrown in some additional pictures of the Water 2.0 Performer just for good measure.
 |
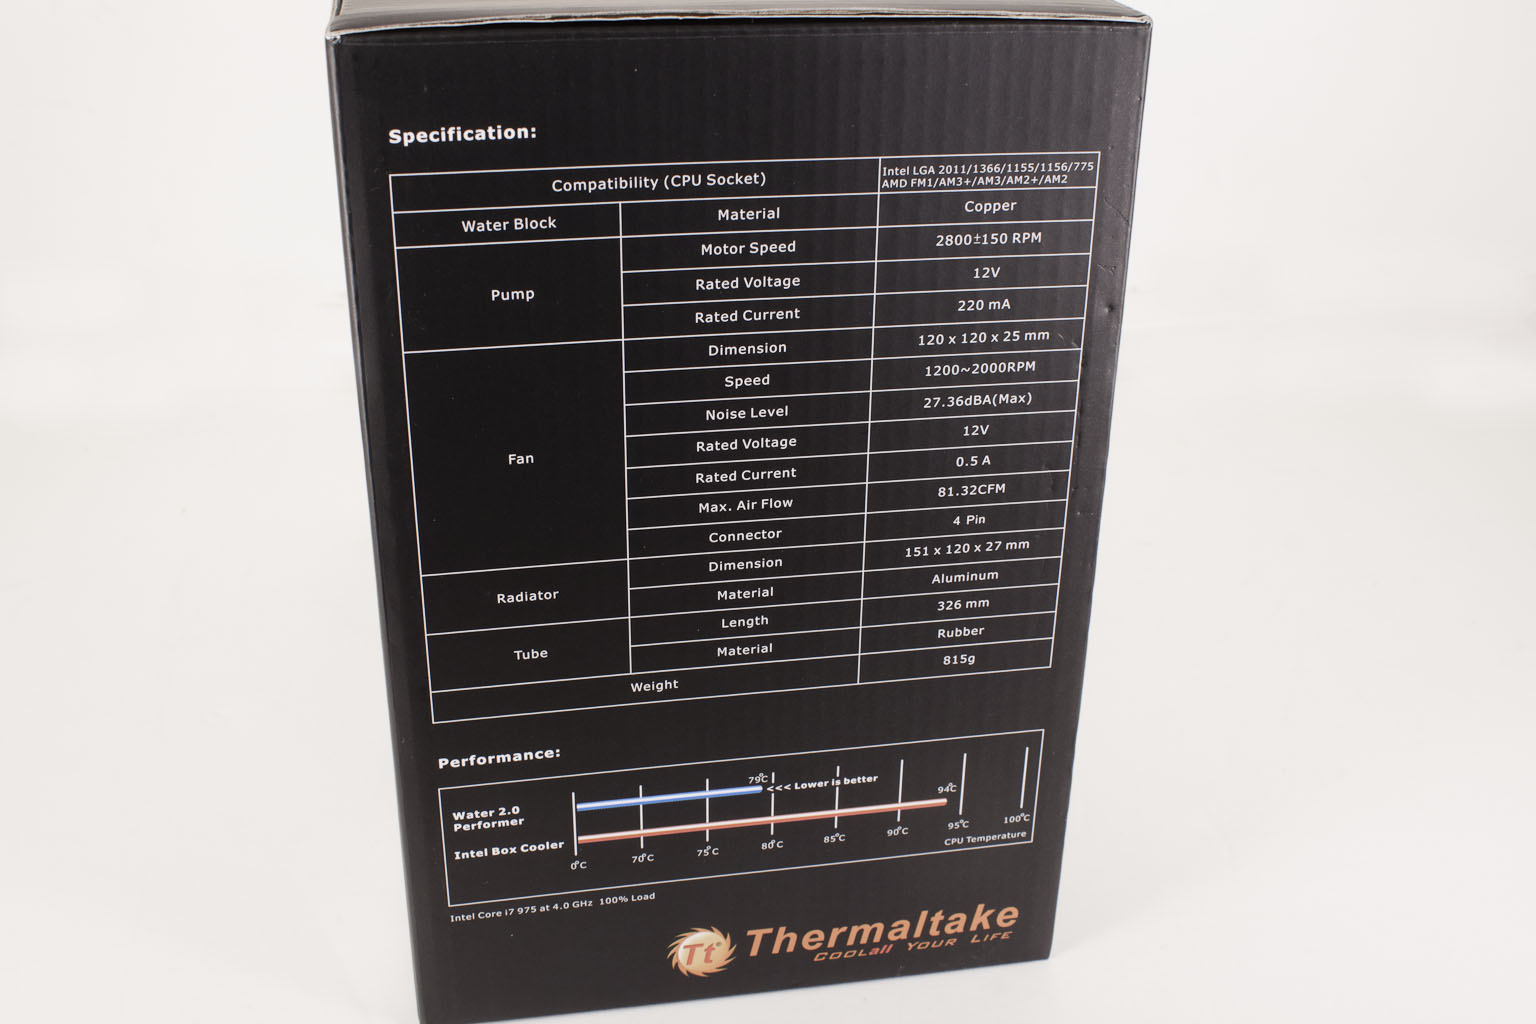 |
Along the side are the complete specifications for the Performer which is actually a very nice thing to have when you are comparing one product with another.
 |
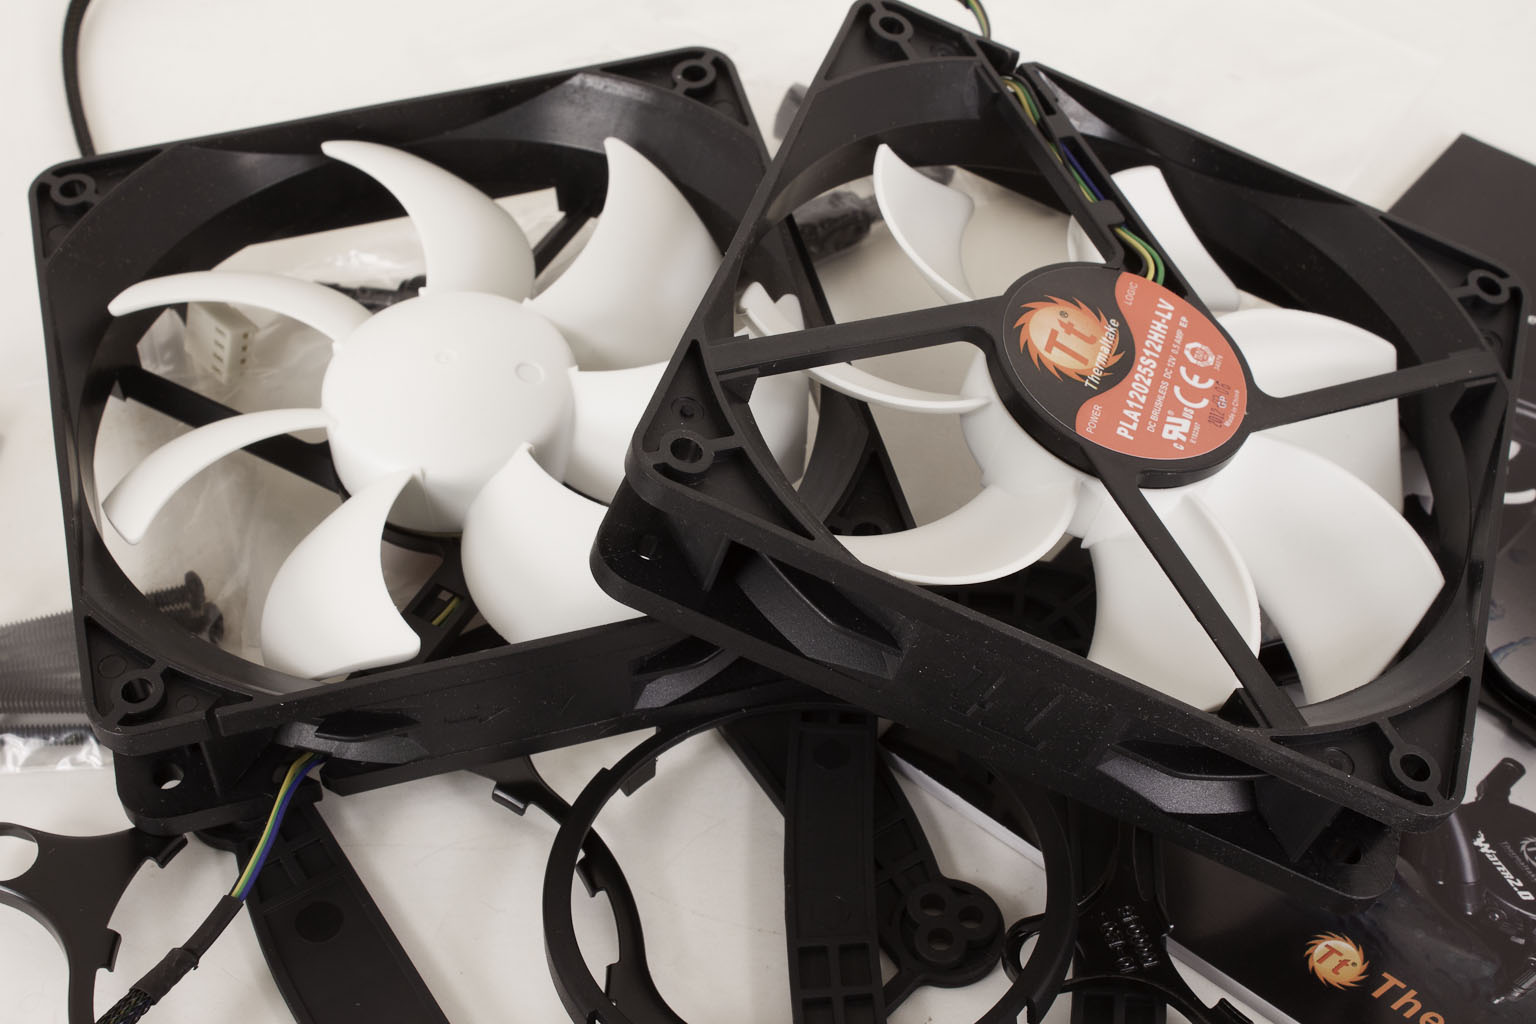 |
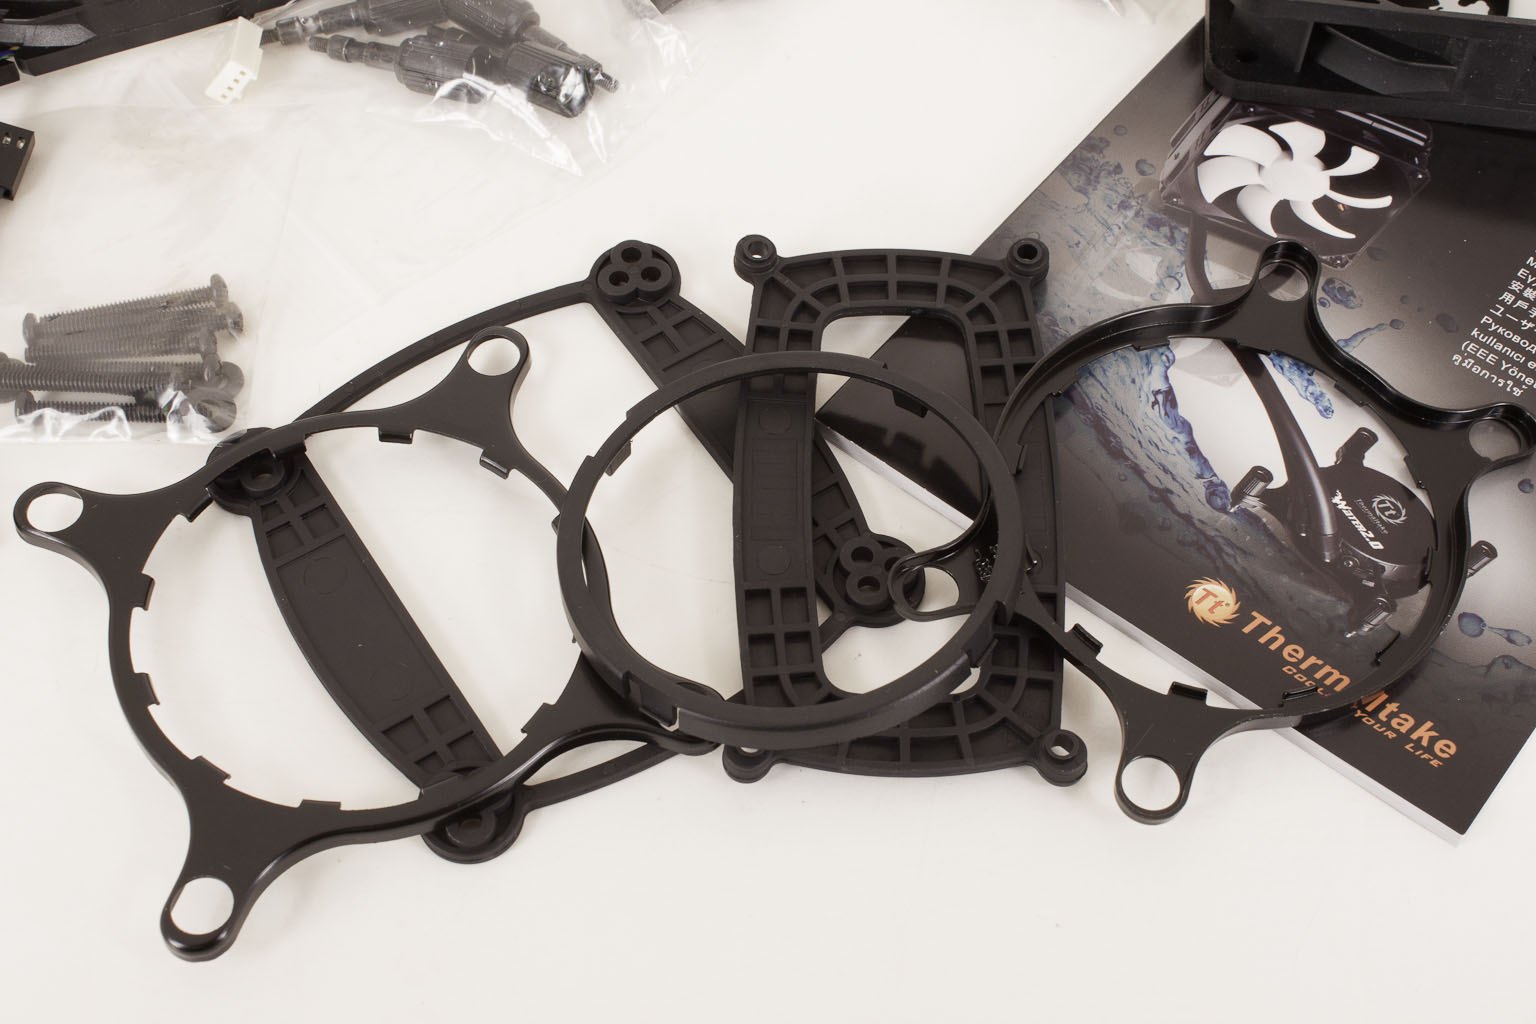
Inside the box (along with the actual Water 2.0 Performer) you will find everything you need to use this with your Intel or AMD based motherboard. You have back plates for the both Intel and AMD along with hold-down clamps a 4-pin fan cable splitter, two fans and a lot more.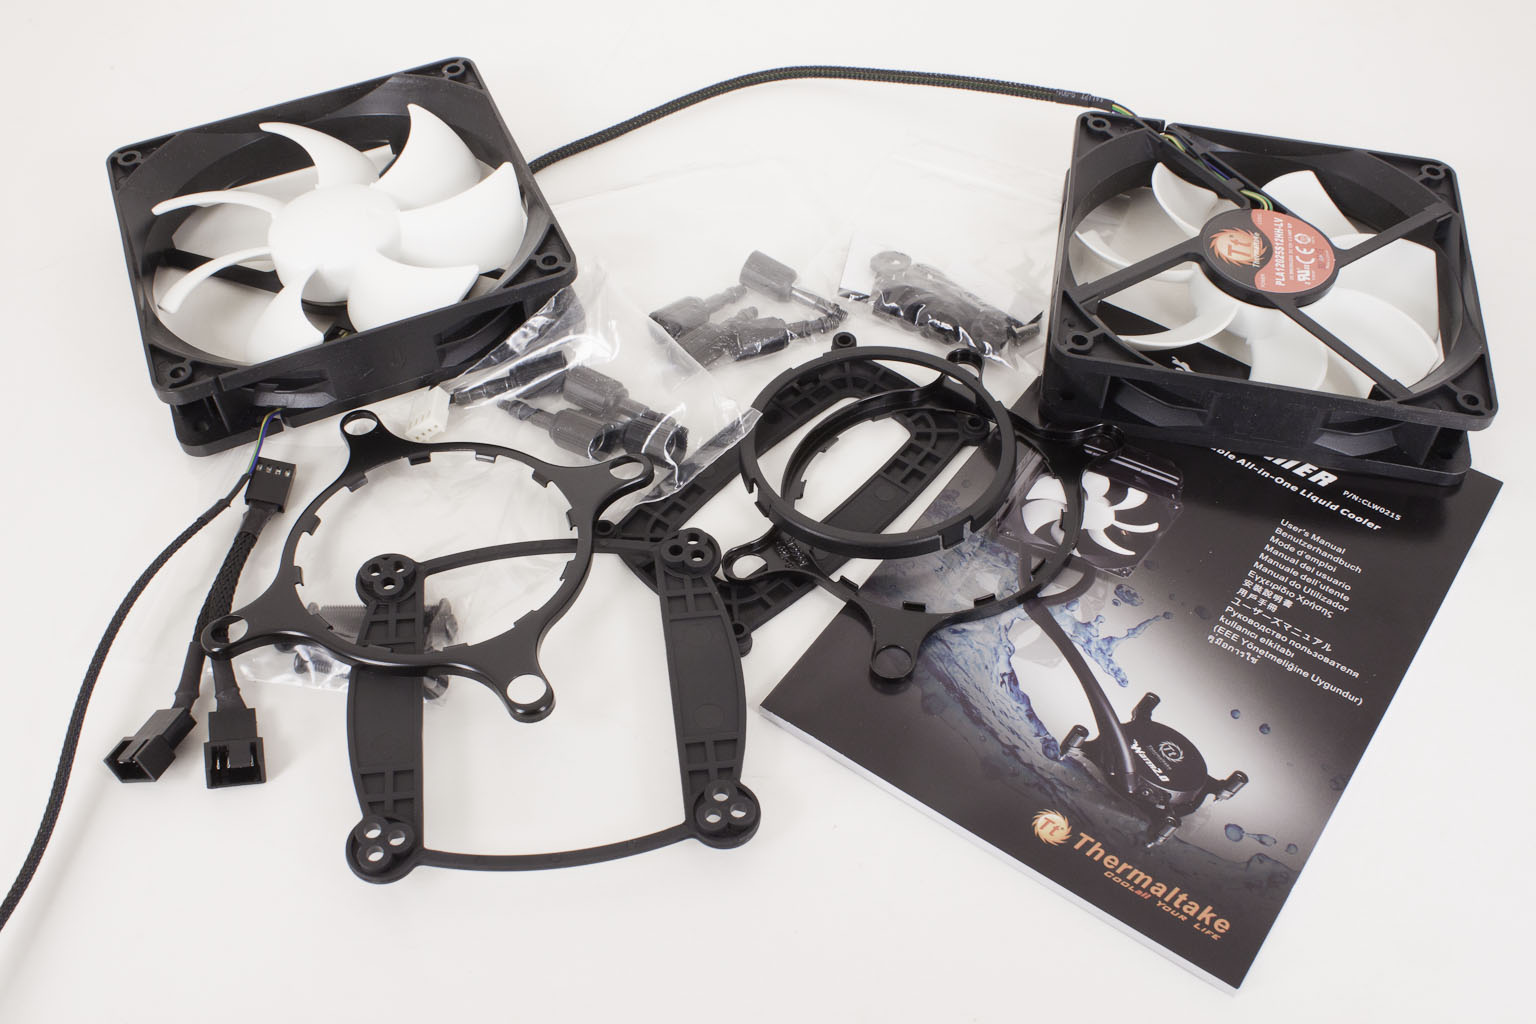
The Thermaltake Water 2.0 Performer-
Thermaltake’s Water 2.0 Performer is the low-end of the two Water 2.0 products. At the very bottom is the plain Water 2.0 with a thin aluminum radiator that measures 151 x 120 x 27mm and has a cooling surface of 1385 square cm. Although this is smaller than some of the other products on the market you should still be able to keep even the Sandy Bridge E CPUs cool under most conditions (although we would not want to overclock too far.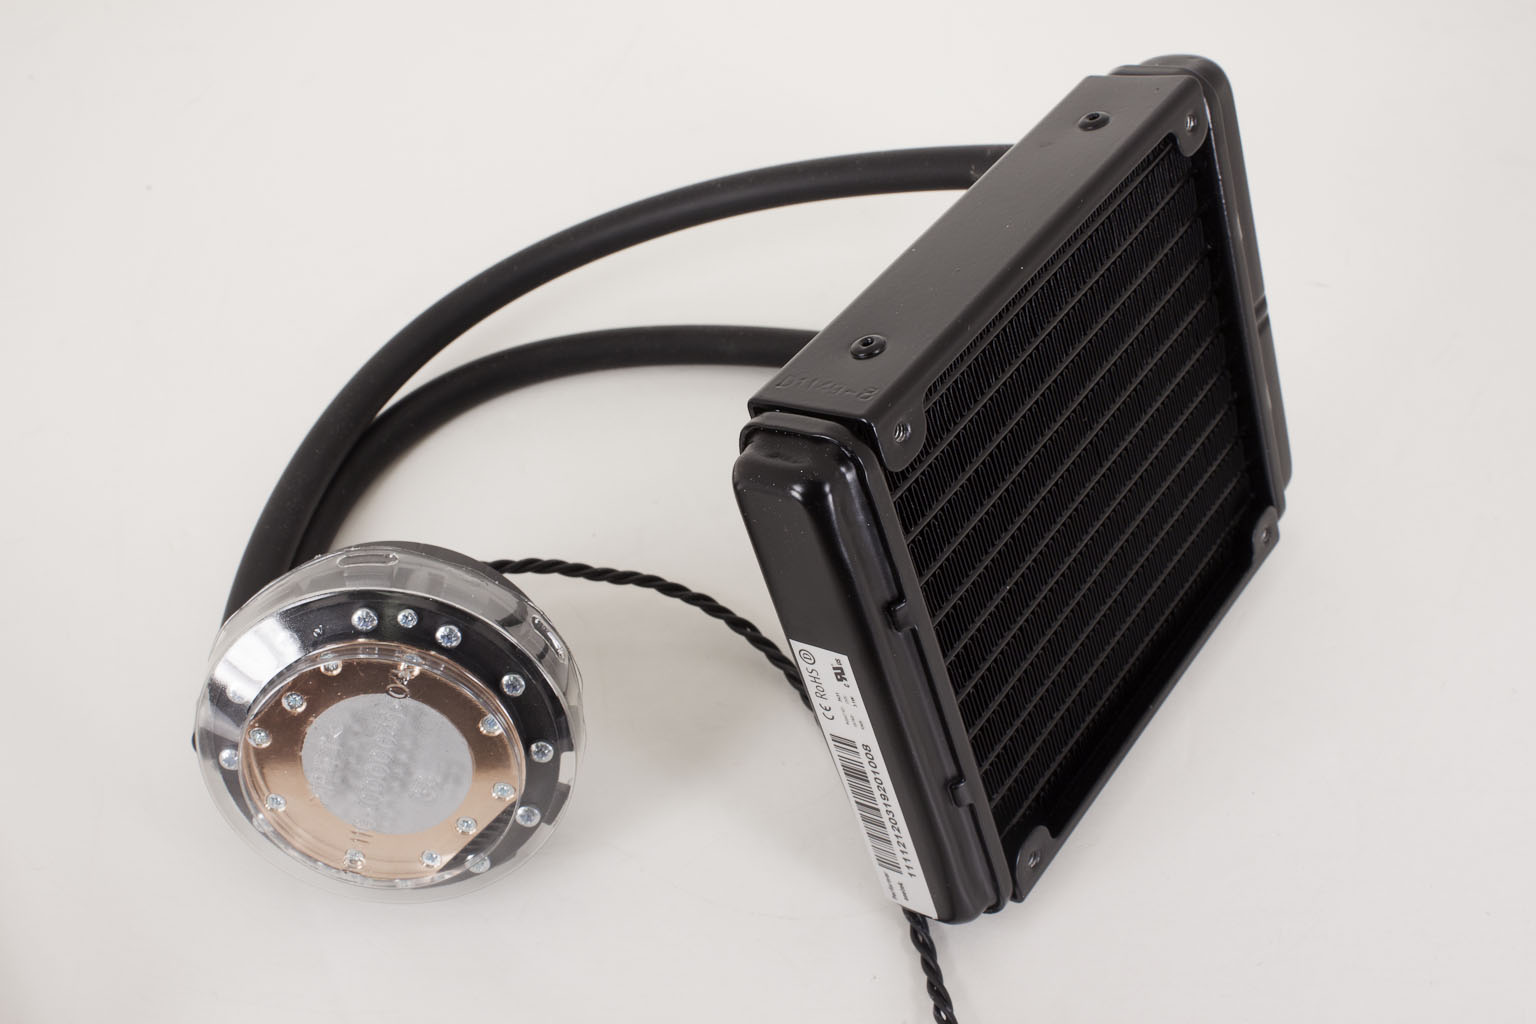
Like most AIO (All-in-One) cooling systems the cooling head also contains the pump which is intended to keep the liquid moving and your CPU temperature under control. Thermaltake uses a 12V pump with a rated RPM of about 2800 (+/- 150RPM). Unfortunately we do not have enough information to give you actual Gallons Per Minute but at 2800RPM you should be getting more than enough to cycle the liquid through at a consistent rate. The base of the cooling head is copper and is designed to make the most contact with both Intel and AMD CPUs. It would have been a better design to have a square head like the Epic180, but considering the fact that Thermaltake probably buys most of their parts from other sources you get what you can (to the best of our knowledge only CoolIT makes a square head and that only for MAINGEAR). Still the overall design, while the same as many other AIO cooling systems is still a good one.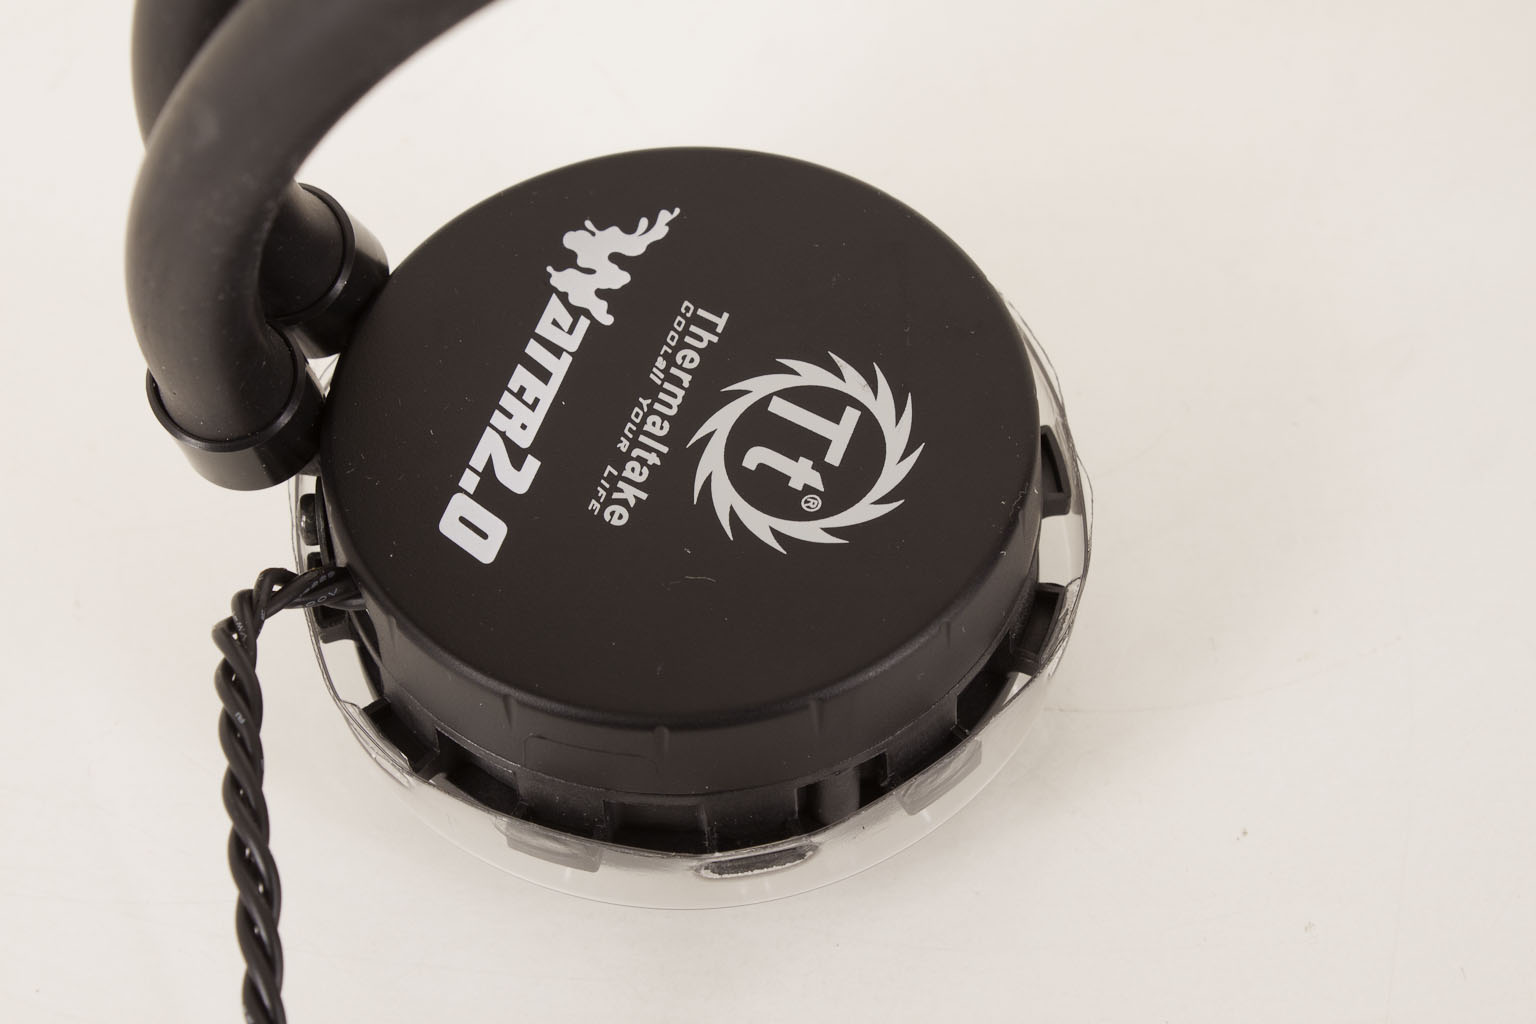
Connecting the cooling head to the radiator Thermaltake has chosen to use rubber tubing. They have given you a little more length than is common (326mm) but this is also good to allow for easy installation and less pressure on the connections at the head and radiator.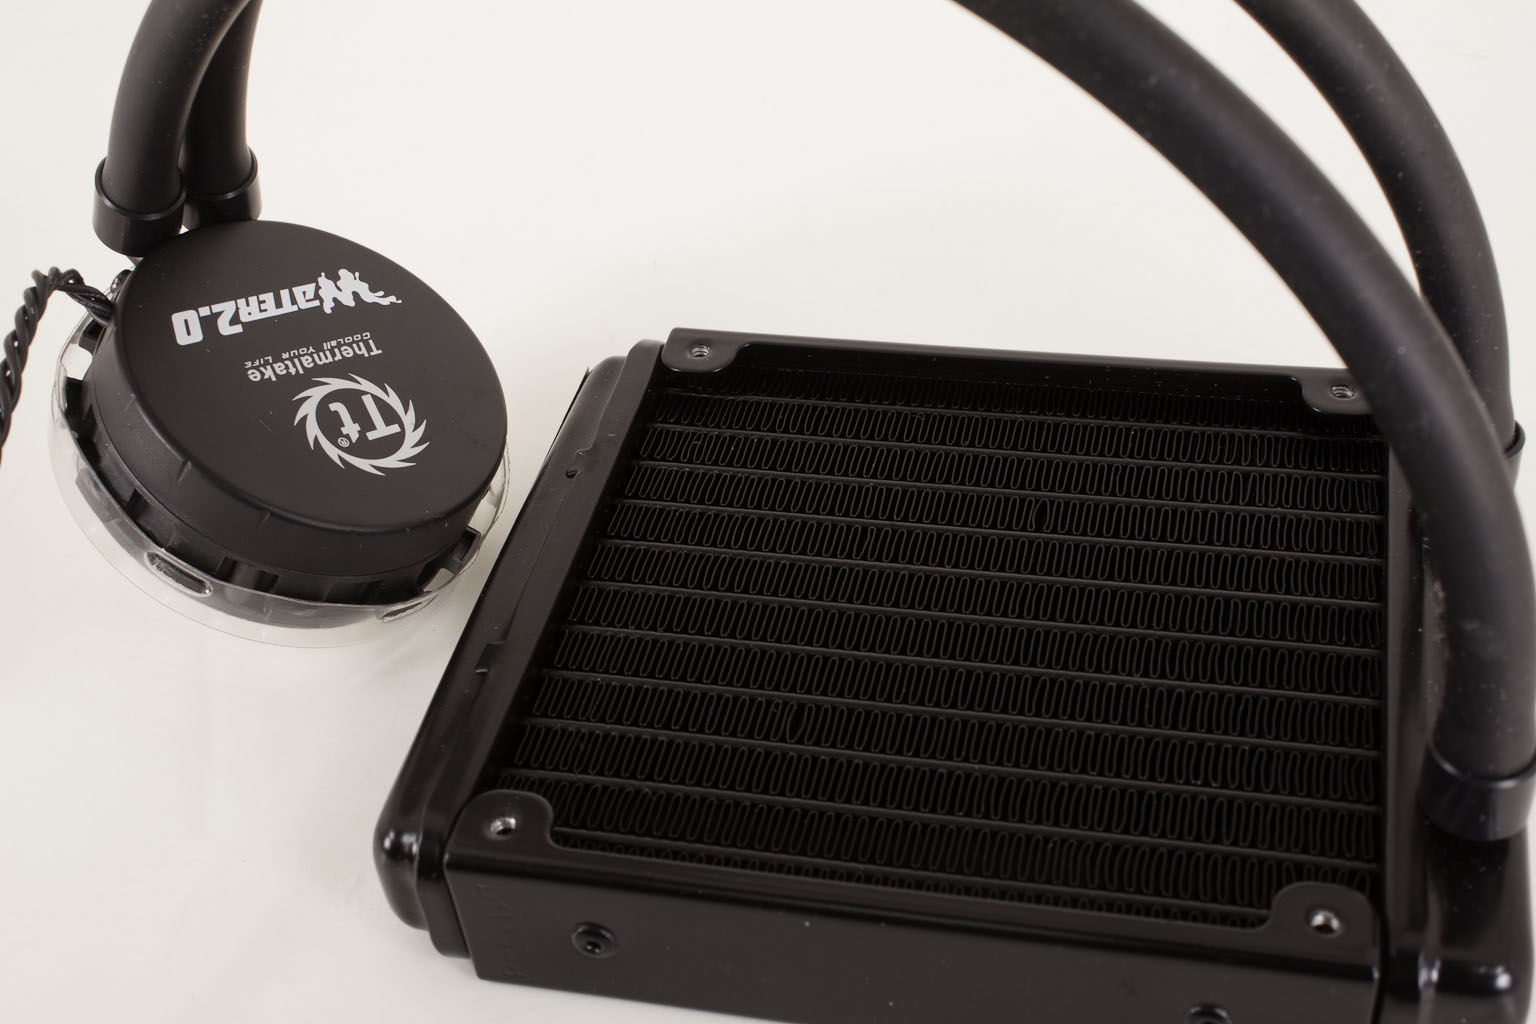
To keep air moving over that 1385 CM^2 of cooling surface Thermaltake has included two 81CFM fans. These are4-pin PWM fans and have a speed range of 1200RMP to 2000RPM and make a maximum of 27dBA at full speed. All in all the Water 2.0 Performer looks pretty good on paper even with the smaller cooling area from the radiator.
Installation -
Getting the Water 2.0 Performer setup was a snap. Really there was nothing to it… well as long as your case has room for it. We found more than one instance where the Water 2.0 would not fit in the back fan area due to the how much room was left in the top of the case (including a couple of Thermaltake cases).
The first thing you want to do is prep the mounting brackets that you need to use for your socket type. For our testing this was the LGA 2011 mounting kit. You can check out our video below to see how to prep the head for the Water 2.0 kits.
One you have this setup your next step is to mount the front fan on the radiator. You will mount the back fan when you place the radiator unit into your case. Just place the rear fan on the 180mm fan grill and thread the screws through the fan and into their spots on the radiator from there simply plug the fans and pump into power and you are almost done. The last thing you will want to do is go into your BIOS and make sure that you turn off any fan controls for the power to the pump. You simply do not want the pump running at a reduced power level as it will hinder cooling.
When this is done you are all set.
Performance -
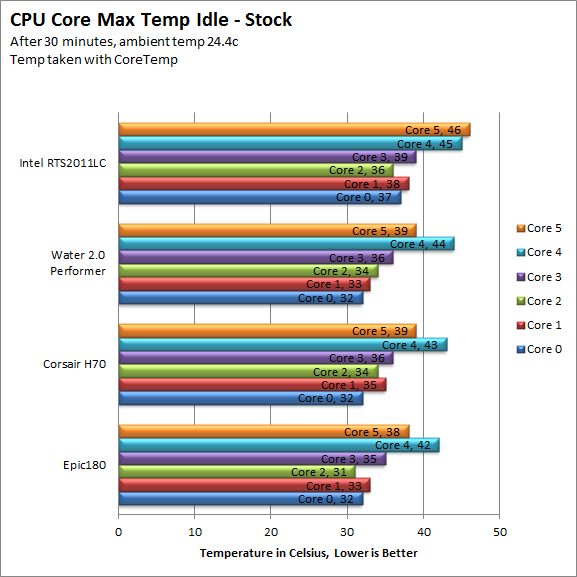
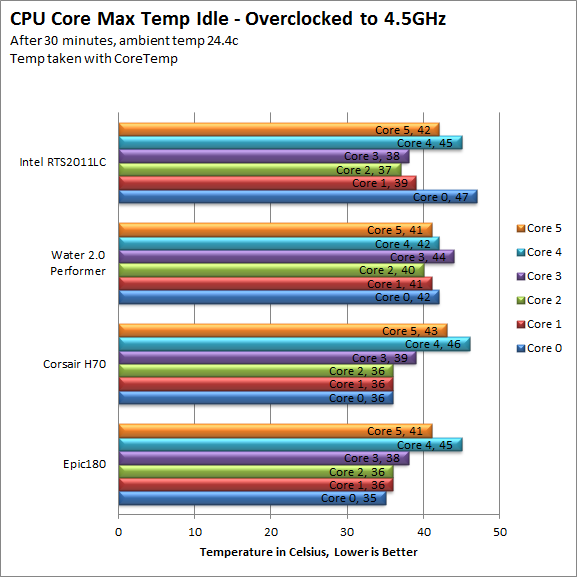
To see how well the Thermaltake Water 2.0 Performer is at cooling we compared it to three other self-contained cooling units. The MAINGEAR Epic 180, Corsair H70 and Intel’s own water cooling rig for the new Sandy Bridge E CPUs the RST2011LC. To get the best idea of how each of these performs we set up a battery of three CPU intensive tests. Each is capable of bringing the CPU to 100% for an extended period of time. Each of these tests was run twice at Stock Speeds and then again overclocked to 4.5GHz. We ran the two test runs back-to-back and then the maximum recorded temperature for each core was recorded. To record these we used CoreTemp. Ambient temp was 22c for all tests the system used is shown below: Here you can see the stock and overclocked idle temps for our baseline. The Water 2.0 Performer does a pretty good job at keeping things cool when there is nothing but background services taking up CPU time.
| Stock temps - Idle | Overclocked Temps - Idle |
 |
 |
Our in lab tests are listed below;
3DMark 11 -
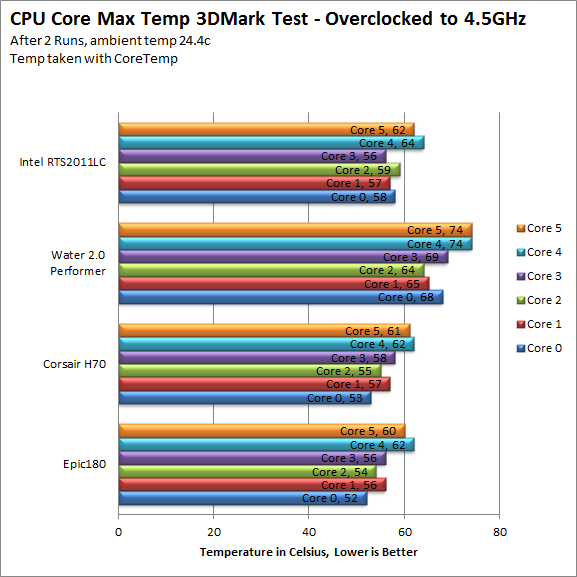
3DMark 11 is the other Futuremark test that we run on our motherboards. This test simulates the typical tasks that a GPU (and system) would have to perform to provide you with a good gaming experience. It is based on the DX9, DX10 and DX11 engines but can only be installed on Windows Vista or later. The suite of tests covers DX9, DX10, and of course DX11 rendering; it also covers AI computations and physics. That’s right I said Physics the latest version of 3DMark uses a Havok physics engine. This removes the advantage that nVidia had with 3DMark Vantage.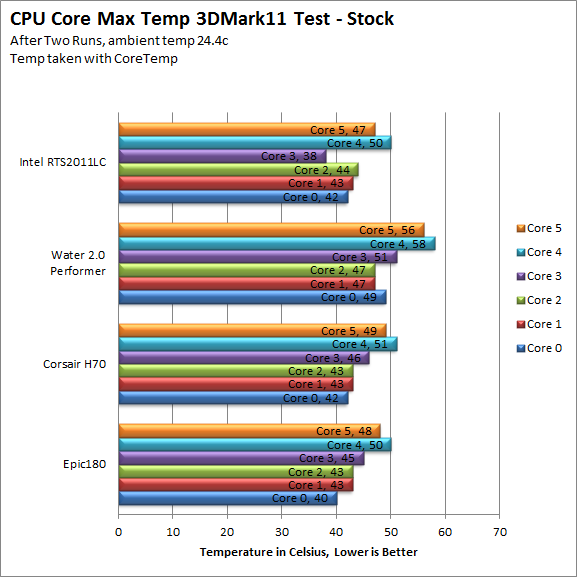 Under 3DMark 11 our maximum temps for two cores (Core 4 and 5) at stock speeds pushed a little farther than we would have liked to see. But this could also be the way the thermal paste is centered on the cooling head. We recommend removing that past and applying a thin layer to the top of the CPU HIS to ensure proper coverage over the entire processor. When overclocked it looks like the smaller radiator and its limited cooling surface is starting to show. The Water 2.0 Performer did not do as well as the other cooling products we tested it against.
HyperPi 0.99b -
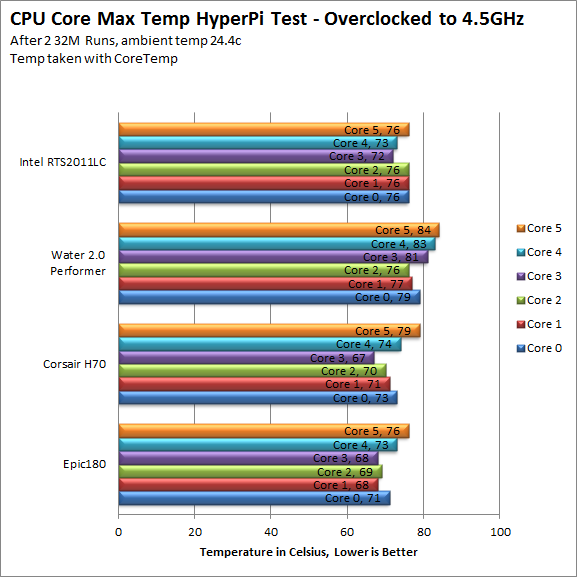
HyperPi is a front end application that allows you to easily run multiple instances of the SuperPi application. SuperPi, for those that are not familiar with it, is an application that measures the time it takes to calculate the number Pi out to as many as 32 million places. This calculation is then checked and run multiple times (up to 24 for a 32M run). This test stresses the CPU, Memory and HDD as data is handed off between the three. If there is a weak link, HyperPi will show it. For our testing we run the 32M test on as many cores (and threads) as the CPU has available. The high temp was recorded after three runs.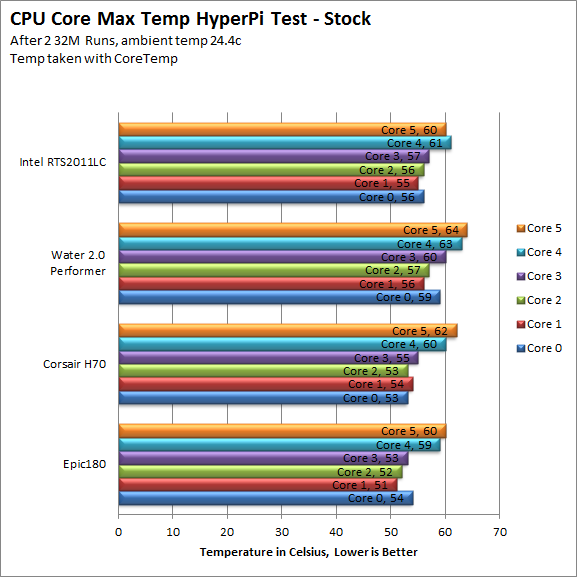 Under the stress of HyperPi the Water 2.0 Performer also appears to get saturated fairly quickly. At stock speeds it is still well within the ball park for where you want the CPU to be, but when we overclocked the CPU things got a little warm with even the coolest CPU core hitting 76c.
Lightwave 3D 9.6 x64 -
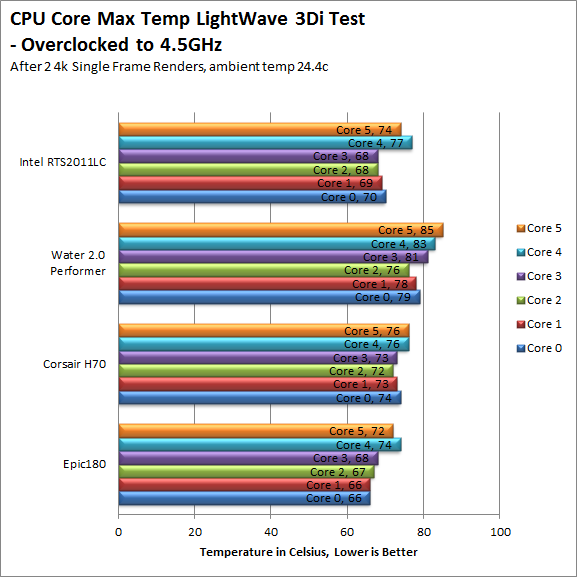
Lightwave is another industry standard application for 3D animation and rendering. It has a large tool base and the rendering engine is highly threaded (when using the right render model). This application is also capable of expanding to 4k resolutions as well as ray tracing for rending the light sources. For our testing we use frame 470 of the Pinball scene found in the LW 9 Content folder. This uses the newer perspective camera that is better suited to a multi-CPU/Core environment. This camera style also uses ray tracing and a much improved anti-aliasing method. Settings are shown below in the attached screen shot. 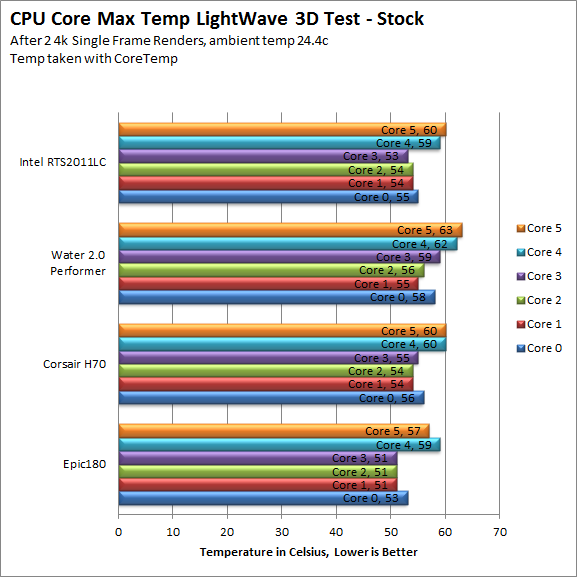 During out Lightwave testing the Water 2.0 Performer seemed to redeem itself. The temperatures here at both stock and overclocked speeds were not all that bad. Considering that temps are the max after two back to back 4k renders this should indicate that the Water 2.0 Performer can handle some stress.
Value -
As we mentioned before you can get the Water 2.0 Performer for about $63 from Newegg or a similar online retailer. This is not a bad price at all considering what Thermaltake is including. We checked out some of the competing coolers in this range and many of them only have one fan and use a pump with a lower flow rate. Thermaltake also covers the Performer under a 1-year warranty on both parts and labor so if something goes wrong with the pump you are not out of luck. In all it is a pretty good deal.
Conclusion -
Water cooling is becoming mainstream as more self-contained products hit the shelves. With a system like the Water 2.0 Performer you can get the benefits of water cooling into almost any system (if it fits in the case) without spending a ton of money or worrying about building your own cooling system and the hassles that can cause. We were expecting the temps to be a little better, but let’s face it the Core i7 3960 does put out a lot of heat even with a modest 4.5GHz overclock. Still this cooler can do the job for you if you are looking for quite cooling and are not intending to try any insane overclocks. The price is good, the temps are fair and the setup very simple, in all the Thermaltake Water 2.0 Performer is great for most mainstream or workstation use; just do not expect to break any overclocking records with it.
Discuss this in our Forum


