The Box and Goodies -
The box that the XS708E ships in is a plain brown box that has very little ornamentation. This is not a bad thing as we are talking about a product that is not meant for the masses (not yet anyway). The box does have the NETGEAR name along with the model number on it so you know what you are getting. The box is also very sturdy so you do not have to worry about your newly ordered XS708E getting damaged in shipping.
Inside the box you have pretty much everything you would expect. You get an installation/manual DVD, a set of rack mount brackets (also called ears) a power cord, some marketing material (at least that was in ours) and, of course, the XS708E itself. Not much to talk about here when you think about it.
The NETGEAR ProSafe XS708E -
Ok, first and foremost the XS708E is a switch meant to go in a cabinet and not a piece of furniture. It is also designed to work at high-speed and operate under possible high-temperatures and 24x7x365. Even though the XS708E is only an 8 port switch you are getting a full sized box and cooling. You might wonder why this is needed. That’s a good question, however the answer will probably surprise you. Simply put once you get to the 10Gbe switch level the controllers needed to get the job done become larger and more complex. In the case of the XS708E we find a Broadcom BCM56822 Switch IC. This is the heart of the XS708E and is responsible for one job, to switch the traffic coming in off of the 8 available ports at full 10Gbe speeds.
 |
 |
 |
 |
The BCM56822 is a relatively new product as traditionally 10GB switches were meant for larger companies. Before now there was not much of a market for a 10Gbe switch that only supported 8 devices. Instead you were looking for 24 or 48 ports to fill that need; to keep things simple you would use an IC that could support 12 ports. This level of IC would make enabling larger switches easier (unless you are Cisco and then you do things in 8 port groups).
 |
 |
Also visible on the PCB are five smaller heat sinks these are for the individual port pairs plus one for the SFP+ port. These control the basic functions of the port and also help to control traffic between the port and the Switch IC.
 |
 |
For power (and power regulation) the XS708E is fairly well put together. The 150 Watt (Max) PSU is open, but protected by a cage that helps reduce EFI while allowing good airflow through the components. The Power regulation is solid with components that you might find on a good motherboard (just fewer of them).
For cooling there are two 40mm 4-pin PWM fans that are capable of exhausting 28CFM (cubic feet per minute) of air. The intake side has a large grill that allows for good air flow unless you put this in a small space. You are not likely to have cooling issues unless you are not smart about where you put your XS708E.
Overall the design and build of the XS708E is pretty solid. Now we just have to take a look at how you get it all setup before we dive into its performance.
The Setup and Configuration Tool -
Unlike many switches in the price category that the XS708E is in there is no Web for you to configure. There is also no RS-232 (Serial) ports to terminal into for a CLI (Command Line Interpreter). Instead there is an application (Prosafe Plus Configuration Utility) that you can run that gives you access to the XS708E and its configuration options. This application is installed via the included CDROM or you can grab it from NETGEAR’s website. The application identifies the XS708E by its Mac address as well as firmware response so that you know you are getting the right switch.
Once the application detects a switch (or switches) you can change the IP to match the range you are in as well as adjust more than a few other options.
 |
 |
 |
Under the system tab you are going to find options for the main configuration of the switch and its core functions (IP address, port status etc.).
 |
 |
 |
One of the features that we linked was part of the monitoring group. This is the cable tester option. If you have ever had a bad cable you know that it is not always the easiest thing to identify (although it is cheap to replace). Many times you might simply have a bad line in a pair which is stopping traffic, but still lighting up a link light. In these cases it is nice to be able to find out where the issue is quickly.
 |
 |
 |
Another nice feature is loop detection which allows the switch to disable one port in the event of a network loop (although in an eight port switch it is a little silly). You also can setup Link Aggregation Groups for trunking or for 802.3ad groups.
Under the VLAN tab you have a couple of different options. One is basic port based VLANS and the other is 802.1Q VLANS. You need to decide which of these you are going to use before you start setting things up though. The XS708E only supports one type at a time. If you try to enable Port Based VLANS after setting up 802.1Q then you will clear any VLAN settings you have (which is a pain). In most cases you will be better off just setting up 802.1Q VLANs as that is what most switches are going to use anyway.
 |
 |
 |
The QoS (Quality of Service) tab has two global options as well. Again these are port based and standards based (802.1p). Port based is pretty much just giving individual or groups of ports higher priority so that their traffic goes first. With 802.1p you can get into a little bit more detail (although really not that much). Sadly there are no advanced options for QoS like you will find in other more mainstream switches such as DSCP (differentiated services code point) class of service configuration or even protocol mapping. The XS708E is a very simple switch when it comes to QoS, but when you have 10Gbe pipe to play with QoS might not be your main concern.
 |
 |
 |

Although we were a little disappointed by the lack of a built in UI we did find that the Prosafe Plus utility was able to make most of the adjustments that we needed it to. Sadly this utility was not functional over a VPN. Even if you make the mistake of giving out IP addresses that put your VPN clients on the same subnet you are not going to get it to work. There should be a way to manually enter the IP address of our switch so you can configure it remotely over a VPN instead of forcing it to search every time you use the utility. NETGEAR should have put a little more effort into the configuration utility and might have wanted to allow for a few more options in the firmware.
Performance -
The performance of a 10Gbe switch is not the easiest thing to test. For one thing you have to have the right hardware to test with. This means getting network cards that are capable of handling 10Gbe traffic. Now there are many of these on the market but most use an SFP+ port which requires a module (fiber) or a Twin Axial Cable for connectivity. The XS708E only has one SFP+ port (a combo port) which makes using those types of cards of limited use. We ended up getting our hands on one Intel X520-T2 and a pair of X540-T2s for our testing purposes. We dropped the X520-T2 in a Thecus N10850 (6-disk RAID 10) NAS while the two 540s went into a VMWare Host and a Desktop/Workstation. The VMware host was setup in a LAG for two what should have been 20Gbe of available bandwidth and while the desktop was only given one connection. For the X520-T2 we used a 15-foot Twin Axial cable and all of the RJ-45 connections used 6-foot Cat 6e cables.
Our testing suite consists of PassMark’s Advanced Network test, Intel’s NASPT (NAS Performance Toolkit 1.7.1), Sisoft Sandra’s Network performance test and some real world file transfers. With these tests in hand we proceeded to put the XS708E through its paces.
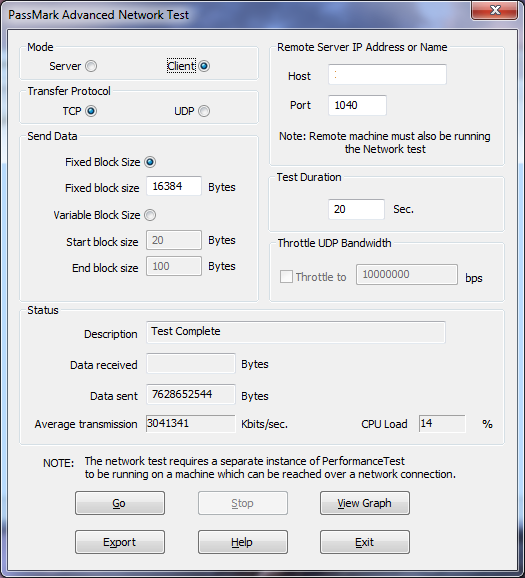
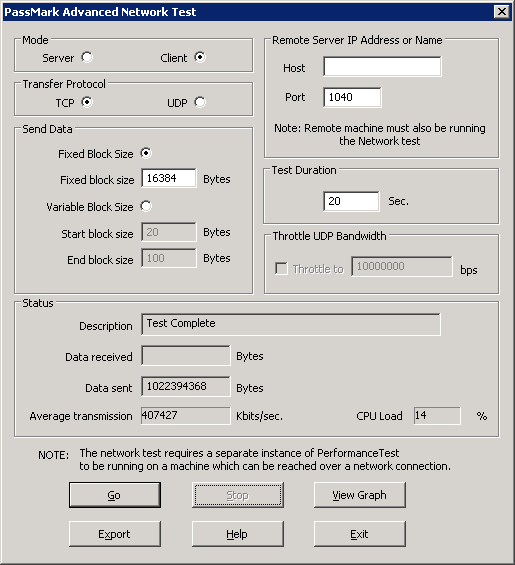
The first thing we noticed after our PassMark run was that we were not seeing the speed we thought we would have. For some reason we were only getting a little under 3 gigabits worth of bandwidth. This was not exactly what we wanted to see considering we were testing over a 10Gbe connection so we tried again (and again). Still the tests were not getting us the speed we knew we should be seeing.
 |
 |
 |
After that we tried Sisoft Sandra’s network test and were still only seeing around 1Gbe of bandwidth and not the 10 gigabits we were expecting.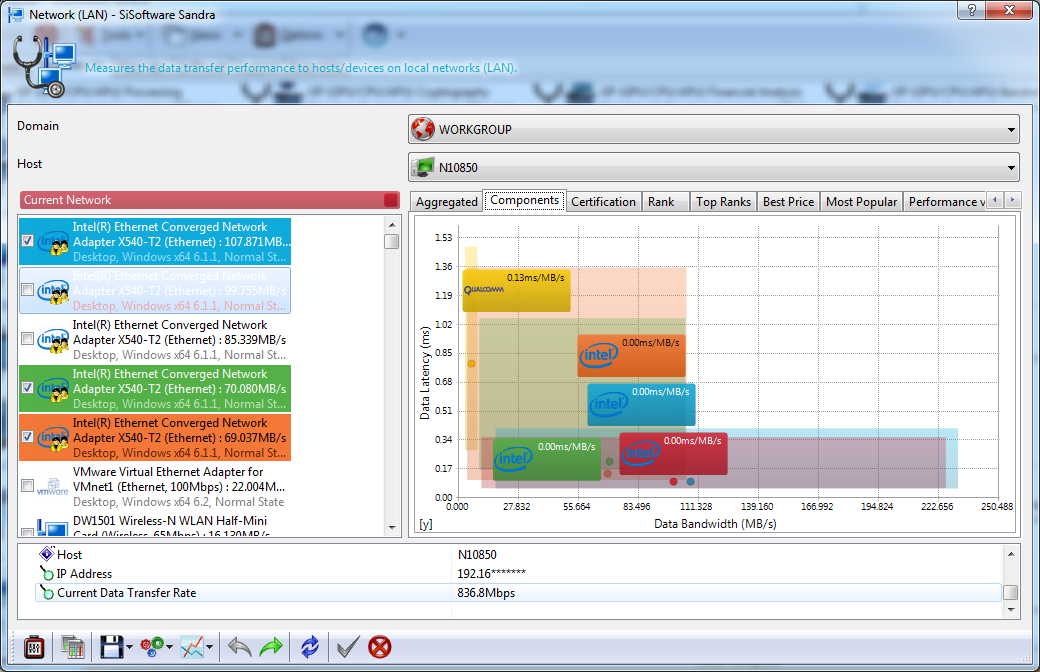
Finally we moved on to another form of testing, using our Thecus N10850 NAS and Intel’s NASPT 1.7.1 to see if there was something wrong with the other synthetic tests we were running. During these tests we saw almost the same thing from the NAS for download speeds but upload speeds did go up from 1Gbe to an unrealistic 12Gbe (the switch only has 10Gbe per port available). Still it shows that the system is capable of more than what we were seeing. Sadly Intel has not updated this software in a while and it has known issues with Windows 7 x64 and any system running more than 2GB of RAM. We do not know if the results of 12Gbe are due to these issues or if it simply has trouble recording speeds this high.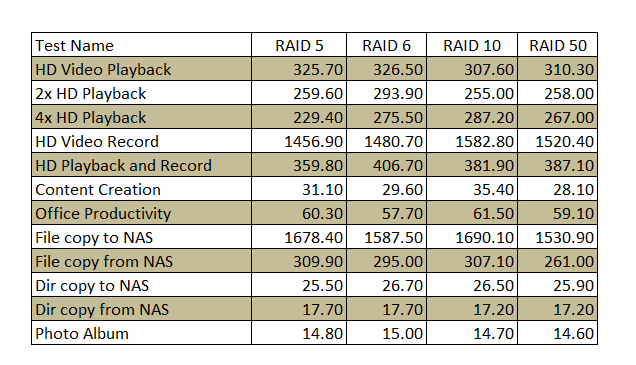
Because of the apparent failure of the tools we typically use we decided to look around for other options. After doing some digging around we found a couple of new tests that appeared to be more geared toward higher end traffic. One was a utility from a company called Tamosoft. Even Tamsoft was not able to give us the results we should be seeing. The upload speed hovers around 1GBe while the down maxes out just under 4Gbe. This is a far cry from the 10Gbe we should be seeing at this point.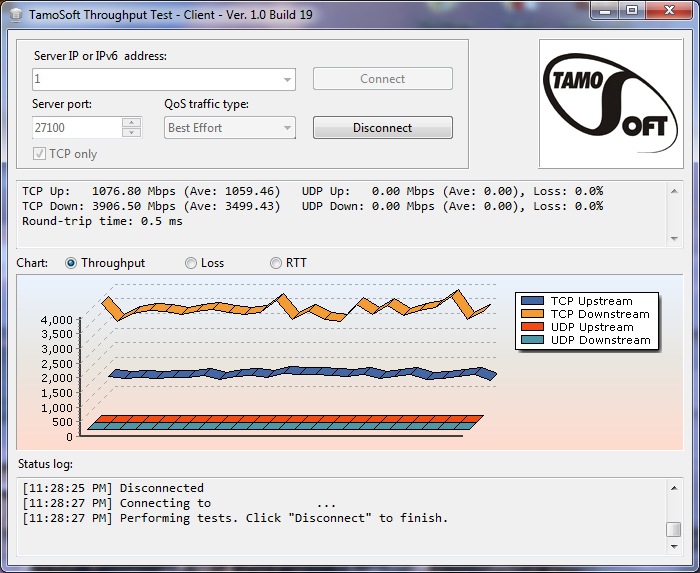
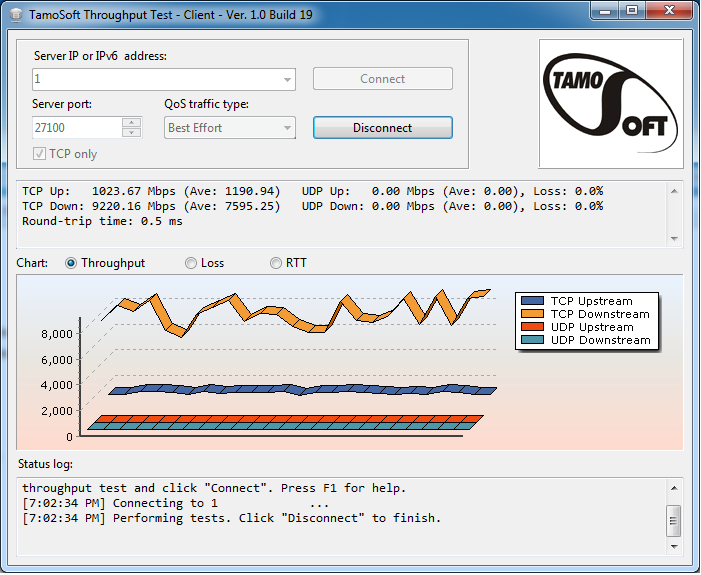
However, all was not lost. We dove back into the setup we were running and rebuilt a few items to be sure we were getting the full speed we should be. We rebuilt the server on and reformatted the NAS we were testing with. After doing all of this we ran through the tests again. In almost every case we saw a small improvement (5-8%) but nothing dramatic until we got back to Tamsoft. Here the downlink speed jumped up and peaked at just under 9.2Gbe with an average of just under 7.6Gbe. The uplink was only an average of 1.2Gbe though which was a little odd. To check this we set the server as the client and pulled from our workstation. This showed us that our workstation was not able to push enough traffic to make a dent in the 10Gbe worth of bandwidth we had available even with 2 SATA 3.0 SSDs in RAID 0.
 |
 |
Real World Traffic -
As with our synthetic tests the real world traffic we generated was not really able to fully saturate the 10Gbe that the NETGEAR XS708E had to offer per port. We were able to move files around at a very high rate when moving from the 10Gbe NAS and to the 10Gbe server, but drive speed still kept us from hitting the top speeds.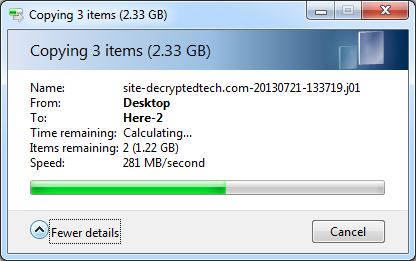
Because of these issues we are working on rebuilding our switch testing systems to ensure that we can max out the bandwidth on just about any switch thrown our way. Even with the issues we uncovered in our testing configuration it was clear that the NETGEAR XS708E was able to deliver on the promise of 10Gbe worth of bandwidth. It was a pretty impressive display.
Value -
Value is another very subjective topic. What is expensive to some might be a deal to others. You can look at this topic in multiple ways. One is raw price and the other is what you get for the money. Each is accurate and both are correct ways to look at price/value. We tend to look at features, performance and real-property when we discuss value. However, we also take into account the raw cash cost of the item.
At under $1,000 for a brand new model the NETGEAR XS708E is a solid buy. There are some things that should be improved on and added in, but for the most part you are getting a solid piece of hardware for a low price. Sadly you will need to pick up 10GBaseT cards (with RJ-45 ports) and Cat6 (or 6e) cables before you can take advantage of what the XS708E has to offer. This makes the overall cost of ownership a little higher, but if you are looking to build a solid backbone for a network then this price is not that drastic.
Conclusion -
As the enterprise pushes down into the medium and small business sector we are going to see an increased need for internal bandwidth. More and more companies are leveraging shared storage and virtualization both of which require bandwidth to work to their best potential. The NETGEAR XS708E brings more than enough bandwidth both small and medium sized businesses without breaking a sweat. There are some issues with the XS708E that you need to be aware of and that NETGEAR should correct soon. The biggest of these is that the configuration utility only works in Windows. You cannot configure the XS708E by any other means. This is a little unusual and something that will put many network engineers off of the product. The XS708E also has some confusing and counterintuitive setup screens. You can easily get mixed up configuring or changing VLans due to the way NETGEAR chose to design the screens for that. The utility will not work if you are not on the same subnet as the switch either. It cannot read across VPNs or VLans and there is no way to manually tell it what IP you want to use. This fault makes it hard to configure or adjust remotely (unless you log into a system on the local subnet). Another issue that stands out is the lack of support for LACP (Link Aggregation Control Protocol) in the XS708E. It does support teaming and trunking through LAGs (Link Aggregation Groups), but you have to configure static LAGs on your other switches in order to use these LAGs.
NETGEAR has to realize that most small or medium sized businesses that are looking into 10Gbe speeds are going to want these features in the product they choose. Fortunately for NETGEAR these items can be corrected with a little effort to make the XS708E a much more rounded product for the market they are aiming it toward. To sum things up the NETGEAR XS708E has a ton of bandwidth available for you to play with and would be a solid addition to the backbone of many SMBs. At least it is if you do not need to remotely configure it, or set up LACP, or setup port and 801.Q based VLans at the same time. While we like the XS708E we are not sure if some the raw bandwidth can overcome some of the missing options that should be present in a switch at this level.
Tell us what you think in our Forum


