Gigabyte's 890FXA-UD7 gets run through the wringer - Test System and Comments


01As you saw with our recent coverage of the Gigabyte Open Overclocking Competition (GOOC) North American Finals Gigabyte is pushing their way back into the fore front of the enthusiast scene.  It was not that long ago when their mindset seemed to be one of just maintaining the status quo and building boards for the average consumer. But something changed their minds and they decided to refocus on the enthusiast and the upper end of the consumer market (the upper-mid-range?)  We began to see Gigabyte (or GB for short) drop things in like 2 ounces of copper into each board. They shifted away from standard capacitors and move to all solid caps. They beefed up their power phases and even added in a hardware/software phase switching capability for better energy efficiency. GB seems to be willing and able to push the envelope of the enthusiast’s needs and even some of their crazed wants with their newest additions to the Ultra Durable line up. They have shown us great promise with their Intel based boards, so how about something from AMD? Not that long ago we took a look at the 890FXA-UD7 with AMD’s flagship CPU the Phenom II X6 1090T just to see if Gigabyte can maintain the same performance levels with AMD as they have shown with Intel’s CPUs.


The Test System and Comments

Our test system is built on an open bench. This has two effects on testing. First it allows us to see everything and also to setup and disassemble the test rigs quickly. Second it means that we cannot gauge the potential air flow found in a normal case. The air is pretty stagnant; some may say this is a great neutral testing method and it can be. However, it does mean that the temperature reading taken off of the components are not accurate to what an average consumer would see. This means that your thermal performance will vary from what we see here.
system

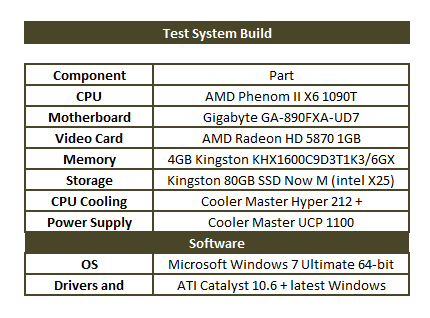
The system build was pretty simple. There is really not much to setting up a system for use on a test bench. We had the usual issues with plugging in the 8-pin Aux power connector but that is nothing new.  Earlier we mentioned the placement of the power and reset buttons on the board. This placement did turn out to be something of a pain. The thought of putting these two buttons on the leading edge of the upper half of the board is a good one, but placing them behind the 24-pin power connector was not. Reaching these buttons was not horrible, but it was awkward.  Driver installation was easy and fast; we did not have any issues getting the extra software installed and within about 10 minutes everything was up and running.


No comments

Leave your comment

In reply to Some User